What is TTL?
Most manufacturers’ automatic flash systems utilize through the lens (TTL) metering systems. TTL flash works in conjunction with whatever metering pattern you are using in your camera to evaluate the scene. It also receives the subject distance information from the lens and emits a “pre-flash” just before the exposure to judge exactly how much light is needed. The flash uses all of this information to automatically calculate how much power it needs to output to light the scene. Now keep in mind since TTL flash metering works off of your camera’s meter, it can run into the same limitations discussed in this article.
Using Flash in Auto-modes
Now the first major limitation you should know about when using flash in most automatic modes (including Program and Aperture priority; Shutter priority doesn’t count since you are picking the sync speed) is that by default, the camera will sync around 1/60. Some manufacturers will limit your sync speed to the reciprocal of your focal length (ie: at 125mm, your camera would sync at 1/125 sec.). The goal here is to eliminate the risk of blur from camera shake, but it often leaves you with a brightly lit subject and dark background.
Essentially, by picking a higher shutter speed, the camera is relying on whatever light the flash puts out to make the picture. This can be great in a situation where your subject is backlit because the flash will “fill in” and prevent the subject from appearing dark while retaining detail in the background. In dim or low-light situations, this can lead to that dreaded “deer in headlights” direct flash picture with only the subject being brightly illuminated. To prevent this, you can shoot in manual or use the next mode.
The “Slow-Sync” Flash
In automatic modes, most cameras have an option for “slow-sync” flash, or what is sometimes called “night flash.” By selecting slow-sync flash, the camera will sync at the shutter speed it would need without a flash. In situations where you want to capture more of the ambiance of the scene, slow sync is the way to go. The flash burst will usually freeze the subject, but your scene might be a little motion blurred so you might need a tripod depending on the situation. You can sometimes get around this by increasing your ISO or using a wider aperture. Below is an example of a shot with and without the slow sync option.
![]()
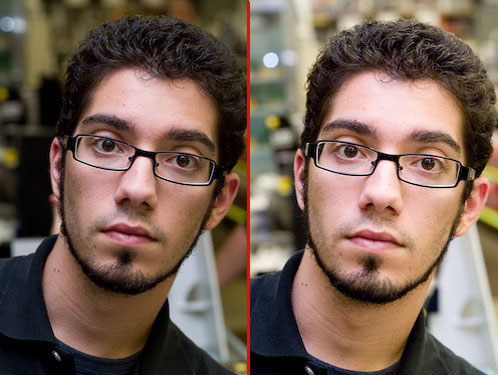
Left: ISO 500, f/5.6 @1/60 sec. Right: ISO 500, f/5.6 @ 1/20 sec.
Both of the above images were shot in aperture priority. The left is taken with the camera picking its default 1/60 second sync speed. The right is taken with the slow-sync option turned on, bringing the shutter speed to 1/20 of a second. The flash exposure was TTL (we locked the flash value to keep the flash exposure consistent), bounced off the ceiling. The first image is what most auto flash shots look like if your sync speed is high: the subject is lit but the background appears somewhat dark. This is because the higher sync speed is cutting out a lot of the ambient light. The shot on the right is 1 2/3 stops slower, resulting in nearly 4 times more light. This gives a good mix of the ambient light and flash, and looks more natural.
One last thing to keep in mind when using a slow-sync flash, you will often times have to deal with conflicting light sources. Your best bet here is to either use a custom white balance or color correction gel. Custom white balance does an okay job, but is not always perfect. In the shot I took, I used AWB and you can see hints of color casts from both light sources (flash and fluorescent). Gelling the flash is the only way to match the two color temperatures together. This article discusses the different color temperatures of different light sources.
Rear-Curtain Sync
Rear-curtain sync is when the flash pops off at the end of the exposure instead of the beginning. In the auto-modes, rear-curtain sync works like the slow-sync flash mode and allows the camera to utilize sync speeds below 1/60 of a second. Since the flash pops at the end of the exposure, rear-curtain sync is great for conveying a sense of action since it freezes the subject right as the exposure ends. I personally recommend using this mode for any longer exposures. This shot is an example of creating that sense of action.
![]()

A demonstration of rear-curtain flash sync. The exposure was 1/5 sec @ f/2.8 The camera was tilted during the exposure while the flash pop “freezes” the water in the fountain at the end.
High-Speed Sync
Most external hot-shoe flashes today support a mode called “High-Speed Sync” (or Auto-FP Mode). Most cameras today offer a sync speed of 1/200 – 1/250 of a second (any faster than that, chances are you’ll see the shutter blade in the shot). This is fine for most controlled situations but limiting in outdoor scenes where you need to shoot faster than 1/250. Without getting too technical, in high-speed sync the flash fires a series of smaller bursts during the exposure instead of one big burst. This allows you to sync at faster shutter speeds but reduces the output of your flash – meaning you need to be fairly close to your subject. (It should be also noted that this feature is generally only available on OEM flashes or 3rd party dedicated TTL flashes. The ability is also camera-dependent as well.) Here is an example of how a fast sync speed is useful outdoors:
![]()

High-speed sync/Auto FP flash. Exposure of 1/500 sec @ f/5.6
Now this was shot with a Nikon D50, which actually allows a higher sync speed of 1/500 of a second (this is because it’s an electronic shutter, not a mechanical like most cameras). The flash compensation was dialed down a bit to add a subtle fill. The goal I had in this shot was not to eliminate the shadows, but merely soften them up a bit. Hopefully it will at least give you some ideas.
Moving to Manual
Once you have an understanding of the flash, I think the best way to work with TTL flash is in the manual mode. If you have a basic understanding of how exposure works and how TTL flash works, this gives you the most control over the scene. You have the most control in balancing the ambient light with the flash and can create whatever effect you’re looking for.
Some Final Quick Pointers
Practice makes perfect. The best way to learn flash photography is to practice. The more you use flash, the better you’ll understand it. Digital has made this much easier since you can see your results instantly.
A little diffusion goes a long way. Learning to diffuse the flash can make a big difference. Whether you’re shooting it through an object, or bouncing it off of a wall, it can give you a very different effect. One of my personal recommendations to get started is the cheap Sto-fen Omnibounce cap.
Move the flash off the camera. An off-camera flash cable can be extremely useful in moving the flash off the camera and giving a much different look. If you don’t like cables, you may want to see what wireless options your camera supports. Some manufacturers support wireless triggering from the pop-up flash. Once you get the hang of using the flash, I strongly recommend experimenting with off camera flash.
Good luck and happy flashing!