One of my favorite techniques for landscape photography is shooting infrared. Digital cameras lend themselves very well to infrared photography because the imaging sensors are very sensitive to infrared light. Most camera manufacturers place what’s called a “hot mirror” over the sensor to filter undesirable wavelengths of light, including infrared, so it does not ruin regular photos. Even though this hot mirror blocks infrared light, it is still possible to shoot in this unique light spectrum. This tutorial will explain my process of shooting infrared photography.
What you’ll need
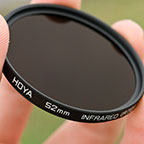
First, you’ll need some sort of infrared filter. Because these filters block out all visible light, they are completely opaque. There are a variety of filters available of varying quality and wavelengths. The filter I use is a Hoya R-72, but other manufacturers, including Cokin & B+W, make similar filters.
Second, you’ll need a digital camera. When shooting with an unmodified digital camera, you are usually better off using an older model. As manufacturers create higher resolution cameras, they generally have to increase the effectiveness of the hot mirror in order to prevent infrared light from showing up in regular pictures. Infrared photos are still possible, but generally there will be much longer exposure times (Note: You can modify your digital camera to get around this, more on this later). The camera I will be using in this tutorial is a Nikon D50.
![]()
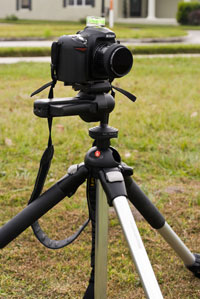
Third, you’ll need a good, sturdy tripod. When shooting infrared with an unmodified camera, the exposure times are usually very long (sometimes ranging in the seconds). Having a good tripod will prevent any blur from camera shake. I would also recommend using a wired or remote shutter release to trigger the camera and minimize vibration. If you do not have a shutter release, the self timer is another option. One thing to keep in mind, even though a tripod will help with camera shake the images will still be prone to motion blur if your subject(s) move.
![]()
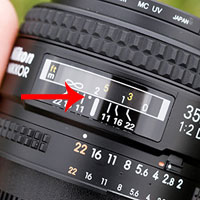
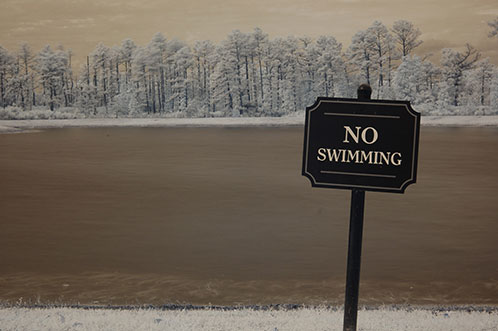
One last thing I would recommend is using a lens with the IR index mark. Since infrared light is a slightly higher spectrum than visible light, you must offset your focus to compensate for this. The IR marking usually indicates how far you must offset your focus to compensate for IR light. Nikkor lenses indicate the IR index mark with a white dot to the left of the focus point, while Canon uses a red dot to the right of the focus point. Keep in mind that this mark is merely a guide and may not correspond to the wavelength of your filter so be sure to check focus accordingly. You can also try using hyper-focal distance if you plan on using a high aperture.
Shooting
The first thing I do before I set up an infrared shot is do a custom white balance with the IR filter on. If you leave the camera in Auto WB, or use the presets, your image will have a strong red tint. This is fine if you plan to convert your images to B&W but problematic for color images. I usually try to perform a custom WB from a patch of grass. This gives a unique look because it gives plants a cyan tint and turns the sky brown-ish. You can also use a custom WB tool such as a gray/white card or an Expodisc for different effects.
Once you have your custom WB set, remove the IR filter. Because the IR filter is completely opaque, it makes composing near-impossible. Set up the shot the way you normally would and focus. I generally take a “reference” shot at this point just to see how different the shot is. Once you have the focus locked, attach the IR filter to the lens. When you attach the IR filter, re-adjust the focus for the IR spectrum and lock the lens/camera into the manual focus position.
Once you take your first shot, check to make sure your image is in focus. Once your shot is in focus, the best thing to do is bracket your exposure. Since your camera has no way of metering for IR light and the amount of IR light varies, bracketing will give you the best possible exposure. Just be sure to watch for blown-out highlights!
Here are the results:
![]()
Reference Photo
Nikon D50, 35mm f/2, 1/160 sec @ f/11, ISO 200
![]()
Color Infrared Using Custom White Balance
Nikon D50, 35mm f/2, 1.6 sec @ f/11, ISO 200
![]()

Black & White Infrared Converted in Lightroom
Nikon D50, 35mm f/2, 1.6 sec @ f/11, ISO 200
Alternative Methods
Full Infrared Conversion
There are companies online that will convert your digital camera to a dedicated infrared model. What these companies do is remove the hot mirror from the imaging sensor and replace it with an infrared filter. They can also re-calibrate the focus of your camera so it focuses in the infrared light spectrum. The benefit of a full conversion is you no longer have to worry about long exposure times, you can freely compose the image as you would with a normal camera, and you would have full auto-focus capability. There are a couple of drawbacks to this procedure. First, it dedicates your camera to shoot only IR. Most importantly, modifying the camera voids your manufacturer’s warranty so if you decide to go this route, you do so at your own risk. More information on modifying can be found at Life Pixel.
Software alternatives
You can turn any normal image into an infrared image through the power of software. There are a number of Photoshop actions and plug-ins as well as Lightroom develop presets to mimic the effects of infrared photography. You can also use these tools to enhance your own infrared shots, or create your own custom black & white conversions.
The plug-in I use for infrared conversion/enhancement is Nik Color Efex. This software allows black & white, color, or thermal infrared conversions at the touch of a button. Here are some examples using the Nik Software to enhance the IR color out-of-camera image:
![]()
Nik Color Efex Pro 2.0 Infrared Color Mode 5
![]()
Nik Color Efex Pro 2.0 Infrared B&W Mode 2
Hope you enjoyed this infrared tutorial – good luck!