If you’ve read the DSLR Buying Guide, you’ll remember I said the “RAW vs JPEG” question could take up an entire article. Well, here it is! This article is a basic overview of the main differences as well as the pros and cons of each file format.
JPEG
If you’ve taken a digital picture, you are probably familiar with a JPEG. It is pretty much the “standard” file format for most digital imaging. Even if you shoot a RAW image, once you’ve processed the image you’ll probably convert it to a JPEG.
Perhaps the biggest advantage of shooting JPEG is the varying image quality and size compressions. If your only plans for the photos were to post them to the web or play them back in a video slideshow, you would probably be fine shooting at a lower image quality. Or perhaps you never print larger than a 4×6 print. In that case, you’d probably be better off with a medium image size. The main advantage here is if you don’t need the higher image quality, you can get more images on your storage card.
The biggest drawback to a JPEG file is that it’s what’s known as a “lossy format.” Essentially, this means if you start doing a lot of image manipulation and re-saving over the original file, you will eventually start to see a degradation in quality. Also, you lose some information when you try to “fix” certain things. Here’s an example:
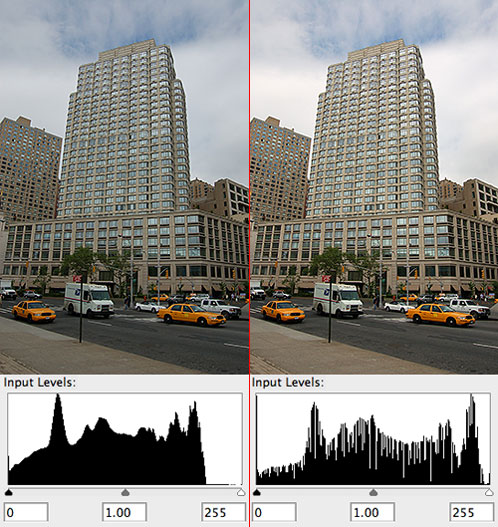
Photoshop Autolevels: Before and After
The image on the left is the original. Notice that it is slightly underexposed and has somewhat of a blue cast to it. The main thing to look at on the histogram is that even though it doesn’t extend all the way to the right into the highlight region, the levels are even.
The image on the right is after using the “Auto-levels” function in Photoshop. The image looks much better and the histogram extends through the entire input range, but you’ll notice it almost looks like it’s been brushed over by a rake. The portions where there are white lines are sections of the image where there is no data, or the program is “making it up.” Now this won’t really affect you in smaller prints or applications for the web, but this can be problematic when trying to make large prints.
RAW
A RAW image is the unprocessed data from your camera’s sensor. RAW images are generally uncompressed or have very little compression. Every manufacturer has its own proprietary RAW file format (.nef, .cr2, .orf, etc.) that generally encrypts some file information (more on that later).
The biggest advantage to shooting RAW is you have much more control of your camera settings including white balance, saturation, hue, contrast and sharpening after you’ve shot the image. With most RAW editors, you never make these changes to your original image. Generally the changes you make are applied to the original image as a “develop” setting once you export the image to a JPEG or TIFF. If you aren’t happy with the changes you’ve made, you can always go back to the original data.
Also, since a RAW image is not usually set to a particular color space yet, you are able to pull out or recover more information from lost shadows or highlights. Here’s an example similar to what we did with the JPEG:

RAW Processing: Before and After
Once again, the left image is the original. I intentionally shot it underexposed and forgot to change the white balance to match the light setting I was in. The right image is after making some adjustments in Lightroom to the exposure, brightness, contrast and saturation. The result is what I wanted the picture to look like, had I shot it properly to begin with. The important thing to note here is that the histogram is not “raked” at all. This has a lot to do with the fact that I’m working with a 12-bit uncompressed file versus an 8-bit compressed file (JPEG).
The biggest drawback to shooting RAW is file size. You can expect to get about half as many RAW images on a card compared with JPEG images (it will be even less if you are shooting something like 14-bit uncompressed). Because you are working with larger files, you also need more memory to edit the files.
The other drawback to RAW files is you have to edit them before you can really do anything with the file. To open and edit/convert RAW files, you need a specific software program to do so. Most manufacturers provide a RAW converter with their cameras, but these often provide only very basic controls. The biggest advantage to using the OEM’s RAW converter is it’s able to read encrypted metadata that third-party converters don’t have access to, including your camera’s settings for color, noise reduction, sharpening and other image processing parameters. Third-party RAW convertors generally give you more control overall but aren’t able to read your camera settings and provide their own “default” conversion. This can be frustrating for first-time users, but once you develop your own workflow, you can create your own develop settings or ones that mimic the manufacturer’s settings.
What about shooting RAW + JPEG?
Most DSLRs today give you the option to shoot both a RAW and JPEG image simultaneously. This can be useful for first time RAW shooters so they at least have a “backup” file in case they decide they don’t want to go through the process. It can also give you a good reference if you are trying to set up your third-party processing software to match the color parameters of your camera. Personally, I wouldn’t recommend doing this on a regular basis since it takes up a considerable amount of space. The other thing to keep in mind is if you shoot a RAW image and simply want to retain the camera processing settings the way you shot the image, all you have to do is run it through the OEM’s RAW converter. By converting the files this way, you’d produce the same result as a camera-processed JPEG.
Conclusion
Both RAW and JPEG images provide benefits. You can get a lot more images per card with JPEGs, but you end up with more compressed data for post-processing. A RAW image does give you more data to work with but takes up a lot more space and requires more work to get the final result. Either way, both formats have their equal place in digital photography.