The Olympus PEN E-P1 is a camera that many photo enthusiasts have been dreaming about for a long time. It’s a relatively small camera with a decent sized sensor and interchangeable lenses. The question on everyone’s mind is how does it stack up? I had the chance to get some hands-on experience with the PEN E-P1; continue reading to find out how it handles.
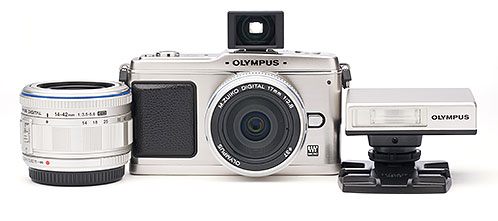
Olympus PEN System
Controls and Menus
Most of the camera’s main controls are positioned so you can easily access them with your right hand while you steady the camera, adjust zoom, or focus with your left. The controls you’ll probably be using the most are the command dial and wheel. The command dial is very conveniently located just to the right of where you would naturally rest your thumb, making it very easy to get to. The command wheel surrounds the selector pad and takes a little bit of getting used to. I can’t help but say it feels very awkward at first. Although I did eventually get used to it, I would have rather seen another command dial in the front of the camera for things like aperture control, exposure compensation, etc.
One of my biggest gripes with the camera is its menu and interface. For a camera that looks so simple, the E-P1 can get very complicated when it comes to changing certain functions.
One prime example I faced is moving the selected AF point. By default you have to access the Live Control menu, scroll down, select the AF targets function, then select the point you want. Now you can customize the controls to make the selector pad move the focus point when you press it, but then it won’t work to adjust the ISO, AF, WB, or advance mode. It would have been nice to be able to map the INFO or Fn button as a focus point selector mode so you could retain the quick functions on the selector point (although you can program the Fn button to re-center the focus point).
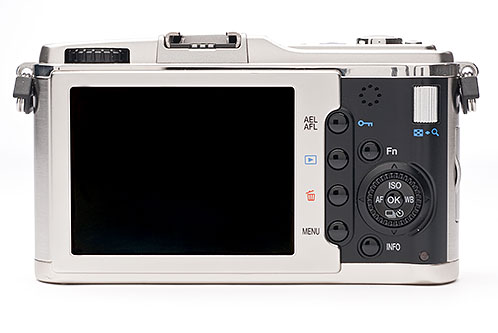
E-P1 Rear Controls
Fortunately there is a pretty extensive “Super Control Panel” that you can access a lot of the most common functions (it looks similar to the shooting settings on the back of an E-VOLT camera). You could call this the Super Secret Control Panel because I stumbled upon it accidentally and there is no indication of how to access it in the menu or the Live Control. To access this “Super” menu, first press the OK button, then the INFO button, and voila! Oddly enough, when you are in the Super Control Panel, there is a reference to get back to the Live Control panel (press INFO) but there is no reference in Live Control to get to the Super Control Panel. It is, however, referenced in the manual, pages 6-7.
The menu itself is pretty extensive, which is not the problem. The main problem is some of the options are not exactly easy to recognize off the bat without referencing the manual (ie: AF Loop, AF Spiral). Some of the functions that you would think would be in the same part of the menu are split into different tabs (ie: picture mode, quality, and gradation are in a completely different part of the menu from noise reduction, white balance, and color space).
These gripes might seem a little nit-picky but should be addressed. The last thing a photographer wants is to miss a shot because he/she is digging through the menu to change or find a particular function. These issues may not be “deal-breakers” for most but will take some getting accustomed to.
Lenses
Olympus launched the camera with two lenses: a 17mm f/2.8 and a 14-42mm f/3.5-5.6. With the 2x multiplication factor of the 4/3 sensor, these equate to a 34mm and 28-84mm respectively in 35mm terms.
The 14-42mm is unique because of its size. Fully expanded, it’s just shy of 3.5 inches, but you can contract the lens down to just under 2 inches for storage. This makes it much easier to pack in a small case rather than a full-sized camera bag.
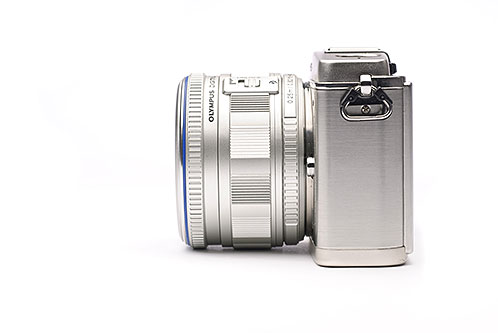
14-42mm Contracted and Expanded (mouse over to compare).
The lens itself covers the standard “kit lens” range you would expect – decent wide angle to medium telephoto. Olympus is very well known for making top quality optics, and this one is no exception. The build of the lens is not quite like the body, but it does have a metal mount and feels very solid. Kit lenses are notorious for getting a bad rep, but this one is excellent.
Next up is my personal favorite: the 17mm f/2.8. Mounted to the camera, the lens is less than an inch long, making it a great compact and lightweight walk-around kit. Obviously, being a fixed lens, it will require a little more work to frame up your subject compared to a zoom lens, but the work can result in a much different type of picture. There’s also a pretty nice external viewfinder available to cover the field-of-view of the lens. The viewfinder is included in the E-P1 17mm f/2.8 kit but can also be purchased separately.
If these two mounts don’t fit your needs, there are other lenses available for the Micro 4/3 mount from Panasonic. You can also use existing 4/3 lenses with an adapter, but depending on the lens, you might lose some functionality. There is also a slew of 3rd party adapters on the market for common mounts such as Leica M and R, Nikon F, Olympus OM, and many more. Usually these adapters are limited manual focus and stop-down metering but can be very useful if you have an extensive collection of old lenses.
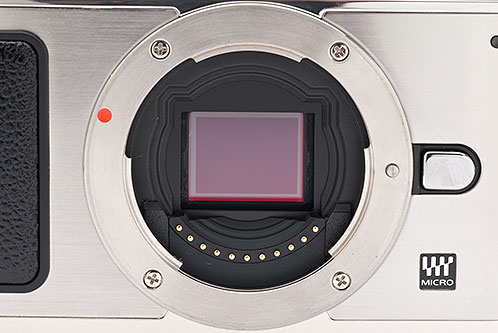
E-P1 Lens Mount and Exposed Sensor
One thing that might make some nervous is how exposed the sensor is when you remove the lens. Because of the nature of the camera, the sensor is completely exposed most of the time, even when you remove the lens. I didn’t encounter any dust problems, but you definitely need to be careful when changing lenses with the E-P1. The camera does have a shutter so many have asked why it doesn’t cover the sensor when the camera is off. I suspect it is because a sensor cleaning is much cheaper than a shutter repair.
Flash
The camera does not have any kind of built-in flash, but there is an optional FL-14 flash available. The flash itself works well, but you will need to make some menu adjustments if you plan to use it extensively. In the Custom Settings Menu, you will most likely want to re-assign the command dial or wheel to adjust flash compensation for each shooting mode (except manual, which already utilizes both of those dials). The other alternative would be to access flash compensation through the Super Control Panel.
The FL-14 flash in action
The flash does a pretty decent job considering its size. It’s not exactly the most powerful little unit, but it certainly gets the job done. My only complaint is the fact that it utilizes AAA batteries instead of AAs. I would rather have a slightly larger flash that takes AA batteries instead of a small unit with AAA batteries.
Performance
The E-P1 produces excellent images. I found that the image quality was better than even the best point and shoots out there, and definitely on par with most of the consumer to midrange DSLRs. Of course, the Zuiko lenses in combination with the sensor produce a lot of detail and very sharp images. High ISO performance was good even up to 1600. Anything higher really starts to show the noise, but 3200 could certainly be used in a pinch.
One thing I was a little disappointed with was the LCD screen performance in bright light. It can be very difficult to see in full sunlight, which is tough for a camera that relies on the screen so much. Shooting with the optional viewfinder for the 17mm lens definitely helps, but doesn’t allow critical focusing or menu adjustments. Perhaps we will see some sort of external electronic viewfinder for future PEN cameras, similar to what Panasonic is doing on their upcoming GF1.
Autofocus
[Editor’s Note: I decided to delay my initial publication of this article because Olympus released a firmware update the day I was going to post it. This update specifically addresses the AF performance. I’ve left some of my initial findings and those after the 1.1 Firmware Update.]
The autofocus system is somewhat hit or miss on the E-P1. The good news is it performs pretty well in bright shooting conditions in S-AF. It’s able to lock on and capture subjects pretty quickly. In C-AF or for fast moving subjects, it can have some problems. This is definitely not a huge issue since the E-P1 is not exactly designed to be a “fast” camera for sports or action.
In low or dimly-lit situations, the autofocus can be very sluggish and prone to hunting – even against static subjects. The camera does not have any kind of built-in AF-illuminator, which seems like a pretty big oversight. In these darker situations, even some point and shoot cameras can potentially outperform the E-P1. It’s a shame because Olympus really pioneered Live View in a lot of their early EVOLT cameras and is still one of the leaders of the technology in the full-size DSLRs.
[AF Performance After 1.1 Firmware Update]
A word about the firmware update process on the E-P1: Unlike most other manufacturers, you cannot simply load an empty memory card with the firmware update to load it into the camera. You will need to install the Master/Studio software provided with the camera to access the firmware. To load the firmware to the camera, you have to connect it via the provided USB cable (not a standard USB cable). As with any firmware update, you’ll want to have a full battery. This is a little tedious compared to other manufacturers, but the process itself runs pretty quickly. Keep in mind, you will want to run an update for both the camera and the lenses.
Once the update was completed, there wasn’t a night and day difference in the focus speed but definitely a marked improvement. The S-AF seemed to snap in a little quicker with both lenses, in both bright and dim lighting. C-AF was less prone to hunting for the subject and tracked focus slightly better but is still slow overall.
I would still stick with my initial comments on the camera after the firmware: it’s great for static or slow subjects but is definitely not suited for fast moving subjects or action. I personally don’t find that to be an issue at all because in reality, I don’t think the E-P1 was really designed with that type of shooting in mind.
Images
Here are a few images from the E-P1.

Olyumpus E-P1, 17mm f/2.8, 1/10 sec @ f/3.5, ISO 800

Olyumpus E-P1, 17mm f/2.8, 1/25 sec @ f/2.8, ISO 3200, Grainy B&W Art Filter
Olyumpus E-P1, 17mm f/2.8, 1/30 sec @ f/2.8, ISO 800

Olyumpus E-P1, 17mm f/2.8, 1/25 sec @ f/5, ISO 800, FL-14 Flash

Olyumpus E-P1, 17mm f/2.8, 1/250 sec @ f/2.8, ISO 400
Olyumpus E-P1, 14-42mm f/3.5-5.6, 1/500 sec @ f/8, ISO 100

Olyumpus E-P1, 14-42mm f/3.5-5.6, 1/250 sec @ f/8, ISO 100
Conclusion
Despite some of its quirks, I really enjoyed the E-P1. The menu and interface take some getting used to, but that can be overcome with time. This is definitely a “read the manual” type of camera, even for seasoned vets. Some of this is somewhat expected from a first generation camera in a particular system – just look at any early DSLR or point and shoot camera compared to a camera from today.
When it comes right down to it, the camera produces great images and is on par with a lot of the low to middle range DSLRs that it competes with in terms of price. It can be a great alternative for users wanting to carry something other than their big DSLR system but still having something comparable in terms of image quality.
Right off the bat, there are some minor changes that would be very welcome for the next generation PEN camera:
External Electronic Viewfinder. For a camera that relies so heavily on Live View, this would be extremely helpful. The viewfinder for the 17mm f/2.8 definitely makes things easier, but what about the rest of the lenses? If it was implemented similar to the Ricoh GX-200 or recently announced Panasonic GF1, it could increase the flexibility of the camera in brightly lit situations.
AF-Assist Lamp. This is something that even the most basic cameras have, and I was very surprised to see it missing from the E-P1. Unless the contrast-detect AF system in low light dramatically improves in the next camera, this is a necessity.
Simplified Controls. As I mentioned earlier, for such a simple looking camera, the E-P1 has a lot of complex controls. I think making the menu selections and interface a little more intuitive, or taking a “less is more” approach, might be the right way to go on the E-P1.
I would say the Olympus PEN E-P1 is a great camera, but it may not be the camera for everyone. The bottom line is it’s able to produce wonderful images, but it will take a little bit of getting used to for some users. If nothing else, it shows a massive amount of potential for the future of Micro Four Thirds cameras.