This article gives five simple yet very effective tips for improving the quality of pictures from your point-and-shoot camera.
1. Anticipate the Action/Squeeze, Don’t Mash
Perhaps one of the biggest complaints people have with point and shoot cameras is the “delay” that the camera has between shots. This was a huge problem with older cameras and has improved, yet not been completely eliminated, with newer models. However, the camera is not always the one to blame.
A common mistake with point and shoot users is they want to (literally) mash the button and have the camera respond immediately. The shot doesn’t come out the way the user wants it, and they get frustrated with the camera. While point and shoots may not be able to respond quite as fast as a DSLR, there are definitely ways to improve your “keeper rate.” If you are pressing the shutter as the action is happening, you are already too late. Keep in mind when you press the shutter, the camera has to focus, and make sure the flash is ready (if you are using it) before it can actually take the shot.
First, point your camera where you think (or want) the action to take place. Then gently press and hold the shutter down half way. This allows the camera to pre-focus in the general area that you want the action to happen. Once it takes place, you should be able to gently squeeze the shutter and take the picture. Your camera might still have some hesitation, but it should be greatly reduced when compared to simply mashing the button. It may take some practicing, but this should help a lot.
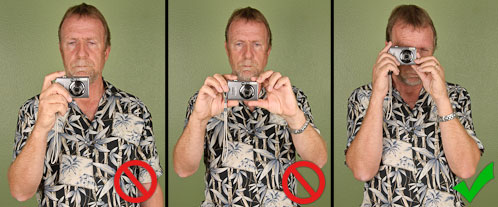
The do’s and don’ts of holding a point-and-shoot camera.
Ideally, a tripod is the best solution for getting a steady shot. If you don’t have a tripod, use whatever is around you. You can easily brace yourself or your camera against a fence post, rock, tree, trash can, ledge, etc. Be creative.

This picture was shot with Leica D-Lux 4 at a shutter speed of 1 second. I used a railing to steady the camera and achieve a slow shutter speed.
3. Use the Exposure Compensation
Exposure compensation is a very valuable yet somewhat overlooked tool. A lot of point and shoot cameras have a slight tendency to over or under-expose the picture in certain situations. Exposure compensation allows you to override the camera’s decision and intentionally make the picture lighter or darker.
A perfect example of when to use exposure compensation is when shooting outdoors. In this situation the camera will do one of two things. Some cameras will “see” too much bright sky and have a tendency to slightly under-expose the entire picture. Others will brightly expose the foreground of the picture while blowing all of the detail out in the sky. By using exposure compensation, you can strike a balance between the sky and the foreground and make the picture look the way you want it to. Below is an example:
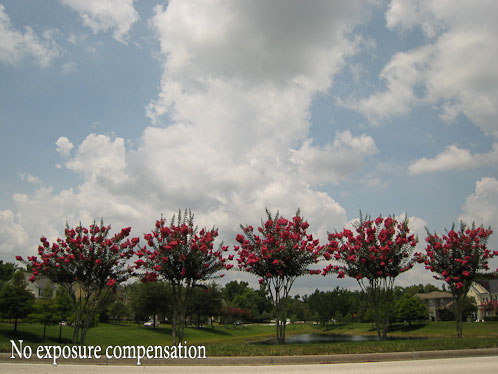
An example of the difference between a shot with and without exposure compensation. Scroll over to see the difference. Shot with a Canon Powershot SD800 IS.
4. Make Adjustments to the Colors
Another simple thing that is overlooked by many people are the color adjustments you can make within the camera. Sometimes this can be the difference between a good and great shot.
Although automatic white balance continues to improve, it can easily be fooled. Adjusting a camera’s white balance to a preset or manual setting generally will give you better results. You can use these settings to eliminate or reduce color casts, or even intentionally warm or cool the picture. You can read a detailed article on white balance here.
Using the camera’s color adjustment is essentially just like picking different film. The default parameters are usually pretty good, but making adjustments gives you more control over the final image. You can do everything from giving the picture more punch to having softer color tones. Here is a perfect example of the difference between the default settings and a quick adjustments.
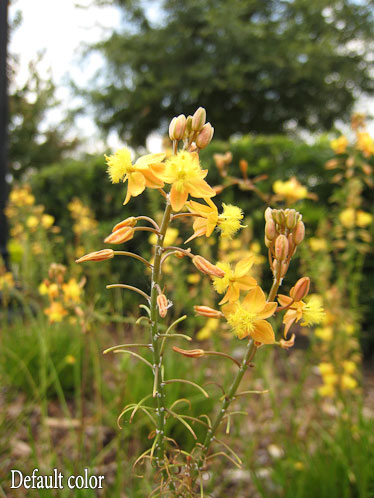
An example of the difference between the default color parameters and switching to the “positive film” color mode. Scroll over to see the difference. Shot with a Canon Powershot SD800 IS.
We can also combine color adjustments with our last tip to get results like this:
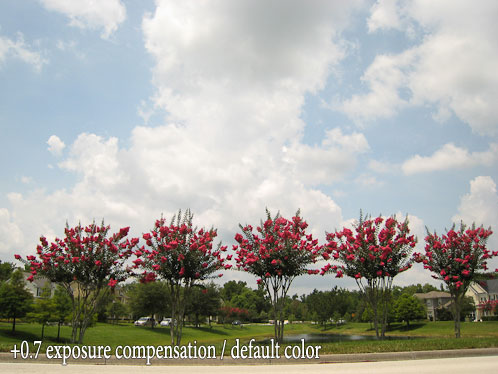
Combining exposure compensation and color adjustment. Scroll over to see the difference. Shot with a Canon Powershot SD800 IS.
5. Use Flash Sparingly
We’ve all seen how unflattering the direct flash from a point and shoot camera can be. Generally your subject looks like a deer-in-headlights and the background is very dark. The simple solution: only use the flash when you absolutely have to. This will definitely take some practice and may not be practical in every situation (ie: moving subjects, dimly lit settings), but generally will lead to cleaner looking pictures.

Using flash vs available light. Scroll over to see the difference.
Another thing to try is using your camera’s “night flash,” when taking pictures indoors (note: this may also be known as other things such as slow-sync, 2nd-curtain sync, or rear-curtain sync). The regular flash mode relies completely on the flash to light up your subject while “night flash” matches the flash exposure with the ambient exposure. The only drawback when using this mode is your shutter speed can be very slow, so you might need to steady your camera or use a tripod. You can read a detailed article on the different types of flash here.
Keep these tips in mind next time you are out shooting. They can apply to virtually any camera. Hopefully these will increase your keeper rate. Happy shooting!